Showing posts with label oppo. Show all posts

OPPO Opens Pre-Orders For R5 In Malaysia


For more details, head to OPPO Malaysia's website.


     The thinnest phone ever made (to this date) is finally available for pre-order in Malaysia! If any of you are interested, you only need to head to participating outlets (which you can find here), fill in your details and a pay a deposit of RM 100 and your pre-order will be taken. The pickup date for the pre-orders is set at 27th December 2014. Even though the R5 is available in Silver and Gold variants, only the Silver variant is open for pre-orders. First 3000 pre-orders also get a complementary gift pack consisting of a VOOC car charger, a free screen protector and a free casing, better be fast if you want to have your share of freebies.


     The OPPO R5 features a body built of industry grade aluminium which is what allowed OPPO to shrink the phone's profile to a mere 4.85mm thickness as well as making it a lightweight phone at 155g. The phone also boasts a 5.2" 1080P AMOLED screen, a first for OPPO, which provides users with better viewing angles and more vivid colours. Sound good enough for you? Find out more on OPPO's official product page!


OPPO Find 7a Review & ColorOS 2.0.0.i Beta (KitKat) Overview


     If you haven't already read my review of the OPPO Find 7, I suggest that you head there as this review won't be as throughout as that one since they are almost a carbon copy of each other in most parts. This review will focus on the differences that the Find 7a has over the Find 7 as well as the ColorOS 2.0 beta which is currently running on Android 4.4 KitKat available for Find 7/7a owners to flash. Without further ado, let's get started.

OPPO Find 7 Review - Is It Time for QHD?


     While I am kinda late to the game, at last I had gotten a chance to review the OPPO Find 7 courtesy of OPPO Malaysia. Without further ado, let's get started with this late review of the OPPO Find 7, one of the frontrunners in the QHD game in the smartphone industry.

WHAT'S IN THE BOX?


The phone itself, a VOOC charger, a normal wall charger, MicroUSB cable, earphones and documentation.

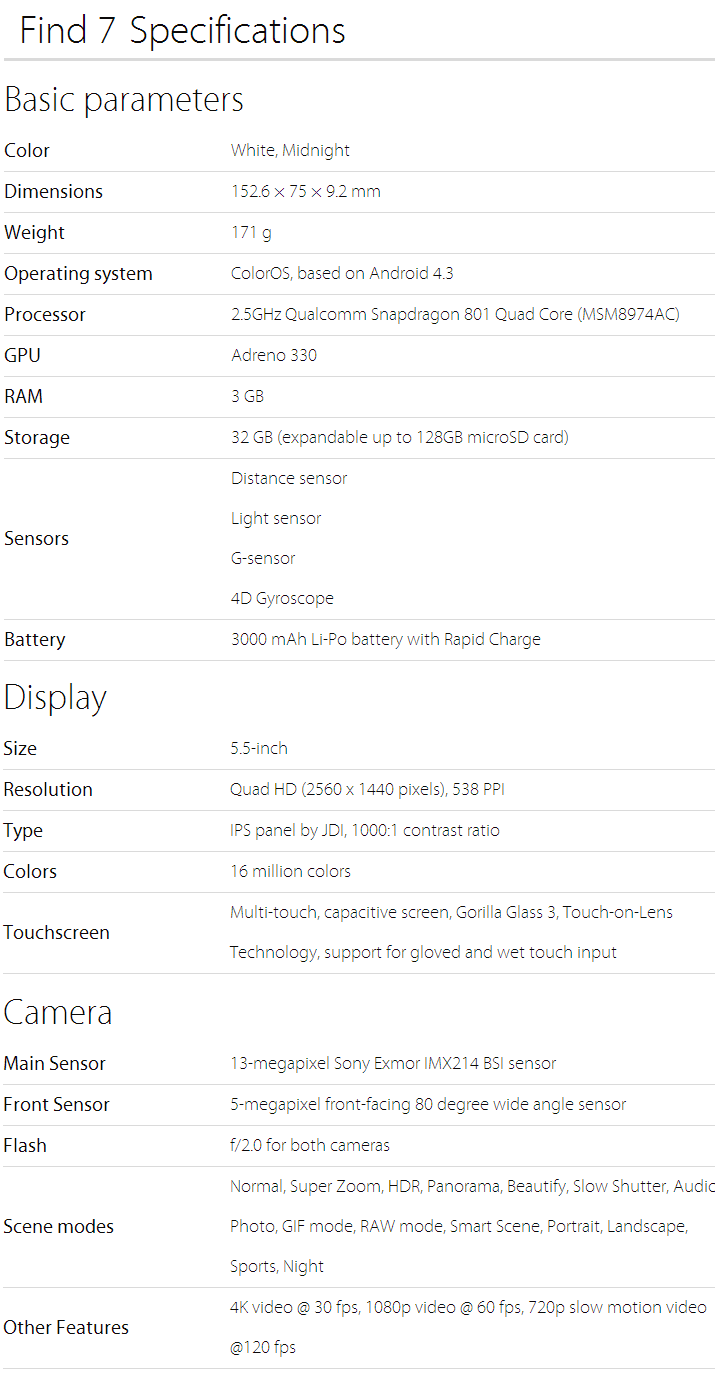
TECH SPECS


REVIEW
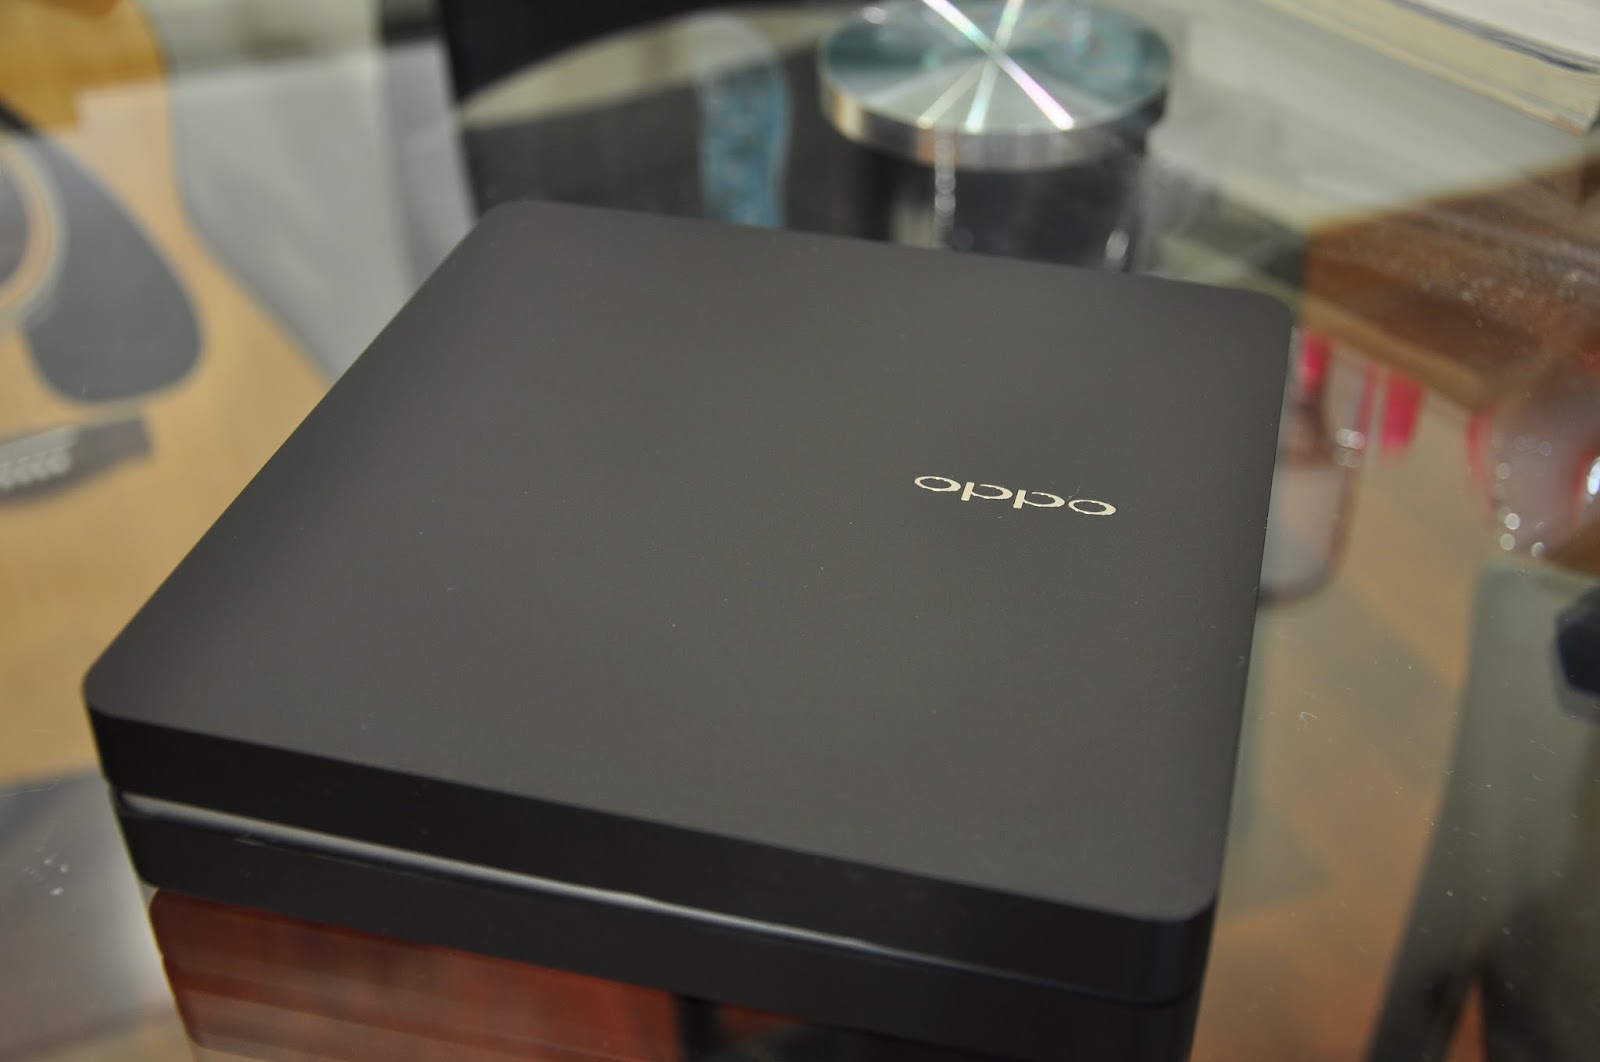
     Let's start with the packaging. As usual, unboxing a flagship device from OPPO is truly an 'experience'. Instead of the white box we got with the N1, this time we are treated with a black box made with the same finishing. In the compartment below the phone, we find all the accessories tucked neatly inside.


     Enough chirping about the packaging, let's shift our focus to the star of the show, the Find 7 itself. Today I have with me the Astro Black variant of the Find 7. The Find 7 also comes in a White variant as well. Looking at the front of the phone, we are greeted with a 5.5" QHD (2560x1440) IPS display, accounting for a whopping 538ppi. In a previous post, I discussed whether it is necessary for manufacturers to push the boundaries beyond FHD (1920x1080) on smartphones; my answer was yes but after trying out the Find 7 myself, I had a change of mind. I also have the Find 7a, an identical twin to the Find 7 with some slight differences including a FHD display instead of a QHD display. Holding them both side by side, I could barely see a difference in terms of sharpness or clarity. Don't get me wrong, the display on the Find 7 is still one of the best displays out there in the market, but as a matter of fact, I would never hold my device close enough for me to notice the smoother edges that a QHD display has to offer. If you would like to read up more on how more pixels affect things, you can read the "Technical" section on this Wikipedia article. So, to answer the question whether QHD is necessary for smartphones, the answer is no; However, is it cool to have? You are damn right it's cool to have one.


     Even though it's been a wall of text talking about the QHD display, we aren't done talking about the display yet. An issue that came up right before the release of the Find 7 was a controversy about the colour temperature of the display compared to its FHD counterpart. It was argued that the colour on the display of the Find 7 was not as vibrant as on the Find 7a. To test this out, I've put both the Find 7 and Find 7a side by side displaying the same photo.

Top: Find 7a, Bottom: Find 7
Left: Find 7a, Right: Find 7

     From the two pictures above, you can make your own verdict about the displays. My verdict though is that the Find 7's display is a tad pale compared to that of the 7a. Some colours just don't look as vibrant as it should on the Find 7. After comparing a few pictures, I found that some like previously stated, look better on the 7a but some other photos look better on the 7 instead. This is an opinion that varies between person to person so you might want to have a look with your own eyes. Another little qurik I noticed was that the Find 7's backlight was a lot more dimmer on max brightness compared to that of the Find 7a. This is probably related to how hot QHD displays could get on high brightness levels. For context, max brightness on the Find 7 is roughly 75% brightness on the Find 7a or any other phone in fact. With this adjustment, there was no danger of the screen overheating; a good trade-off if you ask me. Oh and before I forget, the OPPO Find 7/7a comes with a screen-protector pre-installed!


     Looking further downward, we see the capacitive buttons featured on the Find 7. As an Android purist, the layout irks me as it is still using an ancient layout with a menu, home and back button from left to right. I have no problem with using capacitive buttons but would OPPO please update the layout to back, home and recents instead to comply with Google's design guideline. Anyway, just a minor complaint from an Android fanboy, typical users will be just fine using this layout. Below the buttons, we find a LED strip notification light which OPPO dubs as the 'Skyline' notification light. This is one of the coolest LED notification lights I've seen in a while; while not the first one to be seen sporting this config, it's still pretty much a highlight of this particular phone. One more modification I would like OPPO to make is to have it shine in multi-colour instead of just blue, as I have a need for different shades of notification to tell me whether a notification is urgent or not. Otherwise, a big thumbs up to OPPO for including this.


     The sides of the phone are tinted black on this variant on the phone, with the other variant tinted white. On the right side, we find the volume control buttons which is easy to locate for it has a little edginess to it. The power button is located on the left side of the phone which also sports the same edginess found on the volume controls. Both the power and volume controls are easy to locate due to the previously mentioned edginess of the buttons. One-handed operations wise, mispressing wasn't an issue throughout my one month testing period.


     Turning the phone around, we get to see the nicely textured back cover. The back cover on this Astro Black variant is smooth to the touch. Visually, the texture is as if it was something that was vinyl wrapped with carbon fibre. With that in mind, what I'm trying to say is that the texture is cool to have.


     Opening up the back cover, we see the battery as well as the MicroSIM slot (if you squint your eyes hard enough, you can see the MicroSD slot above the battery on the right). Let's focus on the battery. You can see the wordings 'VOOC' etched onto the lower part of the battery. VOOC is a battery technology which OPPO claims to be able to charge faster and safer at the same time; of course this technology would come with a proprietary charger as seen from the unboxing pictures.


     While I can't test whether the battery is any safer than the norm, I can test how fast the battery is able to be charged. Within 10 minutes, using the VOOC charger, the Find 7 was charged from 8% to 33%; giving the phone another 22 minutes, it charged to 80%. Pretty impressive results and from what I observed, there isn't any sort of unusual heating up during charging. Nice to have for those who can't stay in one spot for too long or when you forgot to charge your phone overnight.

     Right below the battery, we find 2 honeycomb formations which comprise the speakers for the Find 7. From my experience, I found that these speakers can blast at a pretty high volume. For the first time ever, I don't have my ringer set to maximum volume because the Find 7 on maximum volume is so loud, it was obnoxious for me for the first few days. Of course, this isn't a bad thing because it's not uncommon that some media files to have very low volume. With the speakers as well as OPPO's MaxxAudio implementation, the speakers perform spectacularly well compared to other back facing speakers.

Normal Mode
 UHD mode
     Since we are done talking about most if not all of the external stuff, let's talk about the Find 7's camera. The Find 7 is equipped with a 13MP f/2.0 lens; but what makes it different compared to other flagships that also fancy the 13MP camera nowadays? Let's find out. Firing up the camera app and going into the 3-dot menu on the top right, we find a few different camera modes; most notably, the UltraHD mode. OPPO apparently implemented a software feature to enable the camera to take photos of 50MP quality by stitching together 10 photos together. Above you will see a photo taken using normal mode, and the other in UltraHD mode.

    As seen from the samples, the photo taken in UltraHD mode is significantly brighter compared to that of the one taken in normal mode, which is probably due to how the 10 photos are stitched together. Unless you are someone who processes all your photos through Photoshop (colour balancing & downscaling for crisper photos); I recommend that you should just stay with 13MP as the file size in 50MP mode is 3.5 times larger than photos taken in 13MP mode (10.4MB vs 2.92MB) and you could barely notice a difference on your phone. Speaking about pros, the camera can also output in RAW format for even more intense editing in Photoshop. There are also some other fun modes like voice photo, slow shutter (for those amazing highway night shots), GIF, panorama and not forgetting OPPO's very own beautify which significantly reduces complexions on skin. I have posted more photos taken with the Find 7 which you can find here.


Map to the Custom ROMs: OPPO Find 7a


     This post will basically be an overview of a few of the custom ROMs that are available for the OPPO Find 7a: Paranoid Android 4.6 Beta 1, CyanogenMod 11, Omni ROM and Dirty Unicorn v7.9; and a micro how-to guide.

    Before you are ready to proceed, you need to get your device rooted and equipped with a custom recovery. If you have no idea how to do that, you can head over to my other guide over here: How to root your OPPO Find 7 & Find 7a. If you have everything sorted, time to bust out your command line for some fastboot action.

     After making up your mind on what ROM you are going to flash, download the main package, open it up and you will find something called "boot.img" inside the zip file. Put it into your fastboot folder established in my previous guide so you would have something like the folder below. You should also get a Google apps package from wherever your ROM dev recommends. For the Find 7a, it is recommended that you download the micro-modular package from Paranoid Android found here: Micro-GApps on Devhost


     Transfer the ROM's zip file and the Google apps zip file onto the your phone and put your phone into fastboot mode (Power off > hold power + volume up until vibration is felt.). Connect your phone to your PC over USB then fire up a command prompt and type the command below:

fastboot flash boot boot.img
     This will replace your device's kernel with something appropriate for the ROM you are about to flash. After that, unplug and boot into recovery (Power down > hold power + volume down until vibration is felt.). In the recovery menu, do a wipe user data and factory reset then select "Install from zip on sdcard" for CWM or "Install" in TWRP, then browse to the directory of the ROM's zip file, select and then install. After installation is complete, from the same menu, install the Google apps zip file as well. After that, you are basically set and have a new ROM installed on your device! With that clarified, below will be my opinion about some of the more popular ROMs out there.
NOTE: never ever ever use "fastboot erase cache" on this device, it will send your device into a bootloop and the only remedy would be a full wipe.


     Paranoid Android is currently my "flavour of the year" for most of my devices, reason being it simply has been one of the more innovative ROMs that introduces new ways to interact with a device. However, those glory days are over; so what is keeping me from switching to another ROM? Notice how PA has a "4.6" in their current release name? What makes this ROM two increments ahead of the current Android 4.4 KitKat. Apparently PA has implemented several Android L features like expandable heads-up notification, dynamic status bar and the new recent menu. If you are like the ever so impatient person I am, you will be thrilled to experience a piece of Android L before its time of release (which is pretty soon now). However, PA's implementation of a dynamic nav bar still has some polishing to do, while scrolling down, the nav bar will somehow change it's colour to an app's secondary colour, which makes it very uncomfortable to the eyes, you will understand from the screenshots below. To add on, PA also offers support for legacy functions on the Find 7a like the O-click, screen-off gestures and many more; so if you are a fan of OPPO's implementations on its ColorOS ROM, you are still able to utilize those.


     CyanogenMod... basically the staple name in the custom ROM scene. With so many years of experience developing ROMs, one can say that CM is the go-to ROM when stability is a main concern. However, stability is no longer a focus for the CM team as they are releasing nightly builds instead of stable builds on an interval. It also has been too long since anything has happened of note to CM. After incorporating into its own company, CM has been branded as a traitor to the Android spirit and I will be honest that it is also one of the reasons why I don't use CM on any of my devices any more. With all that aside though, CM11 is still a solid ROM for like PA, it also has support for legacy functions.


     This is actually the first time I have used an Omni release on any device. First impressions are that this flavour of ROM is actually pretty bare bones compared to CM11 which I already consider too basic already. What makes this ROM special is the implementation of something called OmniSwitch, think of it as Android's version of the assistive touch found on iOS. You can add your favourite apps onto it as well as access recent apps and also access hardware buttons on-screen. Legacy function support wise, Omni has much work to do as some of my favourite screen-off gestures like the arrow to skip track is not working as of now.


     What is Dirty Unicorn? If that's the question atop of your head, I will answer it for you; imagine a snowball rolling down the hill, picking up every inch of snow on its way down. That is what Dirty Unicorn is, it's a snowball of almost all ROMs known to man. Remember OmniSwitch? DU has it. Adblock? DU has it pre-installed. Anything you can imagine, already compiled into this neat package. However, nothing is perfect. The drawback of taking things from different ROMs and putting it together makes things seem unnecessarily cluttered, not to mention a few hiccups while playing around with what DU dubs as "Dirty Tweaks". If you want a taste of everything Android has to offer, this is the ROM for you. 

     Before I end this post, I would like to say that all these custom ROMs have some bugs in common, after all they are still forked from the same sources so it's no wonder they have similar bugs.
  • Mic not functioning on speaker phone
  • Photosphere and panorama not working
  • SuperHD(50mp) mode not working
  • Screen lighting up randomly when charging on VOOC
     To summarize:

     What's my pick though? If you didn't already know, I have already make it inherently clear that my favourite is Paranoid Android. How about you? What flavour of ROM do you prefer? There is so many different ROMs to experiment with so do head down to XDADevelopers and have a go on your Find 7a!

How to root your OPPO Find 7 (X9076) & Find 7a (X9006) Stock/Custom Recovery [Updated for ColorOS 2.0]


     Let me preface this guide with a little heads up that there is actually a lot of different threads showing different ways of rooting, a lot of which did not specify which method is meant for what specification of the phone. This post will clear up a lot of things in one page so you won't have to snoop around thread pages on XDA.
Note: If you are new to this whole thing, two rules to follow at all times: Have a charged phone if you're going to do anything; Stay calm no matter what message shows up.

tl;dr: Method 1 for pre-updated Find 7a/ Find 7, Method 2 for All Versions of Find 7a, Method 3 for All Versions of Find 7a and Find 7.

Method for ColorOS 2.0 Users 10/11/2014 (Working for X900x & X907x)
As of now, the only method to root will wipe your storage, PLEASE BACKUP BEFORE PROCEEDING. If anything is unclear, refer to Method 2


Files Needed: 
platform-tools: AndroidSDK.zip
Root: JaCh0o_KG3.4.0.zip (courtesy of Oppo forum user: JaCho0)
Recovery Flasher: Find7_Recovery_Flasher_v8.zip

1.     Extract AndroidSDK.zip on your PC, you will have a platform-tools folder.
2.     Move openrecovery-twrp-2.8.0.1-find7.img into the folder.
3.     Plug in your phone to your PC and move JaCh0o_KG3.4.0.zip and Find7_Recovery_Flasher_v8.zip into your phone.
4.     Turn off your phone. Now, hold the power button + volume up button until vibration is felt. Your screen should have the words 'fastboot' written on it.
5.     Fire up a command prompt by holding shift then right click and select "Open command window here" (NOTE: In some instances this command prompt window will not have administrator privileges so I recommend going into your System32 folder, most likely located at C:\Windows\System32 and copy cmd.exe into the SDK folder instead and run the cmd as administrator.)
6.     In the command prompt type: fastboot devices
7.     If everything goes smoothly, your device should show up in a alphanumeric string.
8.     Next, in the command line, type: fastboot oem unlock
9.     Your bootloader is now unlocked!
10.    Reboot into bootloader by typing: fastboot reboot-bootloader
11.    Next, type: fastboot flash recovery openrecovery-twrp-2.8.0.1-find7.img
12.    If no error messages, unplug phone and boot into recovery by holding the power button + volume down.
13.    You should be inside TWRP interface, select Install and browse for Find7_Recovery_Flasher_v8.zip and install. This is to make the recovery changes permanent.

14.    Inside the installer, select TWRP recovery> TWRP 2.8.0.1> Whatever theme and proceed. After installation complete, select reboot into new recovery.
15.    You will return to TWRP interface. Select Install and browse for JaCh0o_KG3.4.0.zip and confirm installation. After installation is done, reboot normally.
16.    Once phone is boot up, check if  'Kinguser' app is on phone. Open root explorer and see if you have root permission. If all is well, congratulations, your device is now rooted.

Method 1: The Easy but Outdated Method

     This method is pretty easy because it utilizes the existing recovery on the Find 7a but the shortcomings are obvious. It ONLY works with ColorOS version 1.2.2i and from what I've observed, most people are having difficulties flashing custom ROMs onto the phone using OPPO's recovery so I suggest that you follow method 2.
1.     Download this file: Find7_ROOT4.3_bbs.oppo.cn.zip onto your Find 7a or Find 7 (yes it works for both phones).
2.     Turn off your phone.
3.     Boot your phone into recovery mode by holding down the Volume Down button and the Power button, once it vibrates, you can let go.
4.     Select the Install from SD option and browse for the zip file you just downloaded. Follow the prompts and if everything goes as intended, you now have a rooted phone!

Method 2: The Veteran's Method
NOTE: This method is strictly for Find 7a (X9006/7)
     This method, while being slightly harder, is the most common method for rooting any other phone, so you might as well practice if you are planning to do this for any period of time. It works for any version of ColorOS and the custom recovery we are about to flash will be much more full featured compared to the stock recovery. We will be utilizing fastboot commands to flash a custom recovery so we will be needing the basic fastboot files found in Android's SDK. If you did not understand a single word in the last sentence, do not fright, download the files below and you will be fine.

  1. Transfer the Update-SuperSU-v1.94.zip onto your phone first for convenience purposes.
  2. On your PC, extract AndroidSDK.zip to anywhere, preferably on your desktop. Then browse into the folders until you come upon something that looks like what I'm showing below.
  3. Move the recovery image file of your choice (CWM or TWRP) into the folder. So you will see something similar to the screenshot below (I chose to go with CWM).
  4. Fire up a command prompt by holding shift then right click and select "Open command window here" (NOTE: In some instances this command prompt window will not have administrator privileges so I recommend going into your System32 folder, most likely located at C:\Windows\System32 and copy cmd.exe into the SDK folder instead and run the cmd as administrator.)
  5. Turn off your phone. Then hold the Volume Up button and Power button until you feel a vibration. The phone will boot up and show the word "fastboot" on screen. 
  6. Connect your phone to your PC via USB cable.
  7. Wait for a moment then in the command prompt type:
  8. fastboot devices
  9. If everything goes smoothly, your device should show up in the list as a random string of numbers
  10. Rename the X9007_CWM_Recovery or X9007_TWRP_Recovery to something simple like recovery for ease of work later.
  11. In the command prompt, type:
  12. fastboot flash recovery [imagename].img
    Replace [imagename] with actual name of image

  13. Something like this will show up if recovery is flashed successfully.
  14. Unplug your phone from your PC and hold Volume Down button and Power button to boot into recovery.
  15. Select Install zip from SD card
  16. Browse for Update-SuperSU-v1.94.zip and install it.
  17. Reboot and your phone is now rooted!
Method 3: The Simplest Method

     This method requires you to download something O-team developed so if you're not comfortable with that, use Method 2 instead. This method will work for all versions/variants of Find 7a & Find 7 and it's pretty straight forward.


  1. Transfer Update-SuperSU-v1.94.zip onto your phone.
  2. Boot phone into fastboot mode by pressing Volume Up button and Power button together until vibration is felt.
  3. Connect your phone to your PC via USB
  4. Run Recovery_Installer.exe and install the program.
  5. After installation successful, this window should pop up.
  6. Enter option number to install recovery of choice. (Find 7a users options 3 or 4; Find 7 users strictly option 5)
  7. Wait for process to complete.
  8. Boot into recovery via the program or Volume Down + Power button
  9. Select install zip from SD card then browse for Update-SuperSU-v1.94.zip and install it.
  10. Reboot and you're rooted!
I used Method 2 if you're wondering, because I am familiar with fastboot anyway. Do recommend you using Method 2 if you are looking into rooting/flashing more phones in the future as it's a common tool when it comes to rooting Android phones.

KENYSL.com @ OPPO Find 7 Launch Event


     Yesterday, I was at the launch event for the much anticipated OPPO Find 7 that was held at Pullman KL Bangsar. Media registration started at 3:30pm but the event didn't start until 4:30pm; too much of a leeway in my opinion and I overheard people who share the same piece of mind. At least OPPO Malaysia provided enough spring rolls for everyone on scene. Two showgirls holding the Find 7 and Find 7a were also there for people to take photos of.

OPPO Announces the Find 7, World First's 5.5-inch 2K Display Phone

Pretty girls with pretty phones

KUALA LUMPUR, May 7, 2014 – OPPO Electronics Corp. today announced the Malaysian debut of its flagship phone of the Find series, the Find 7 – the first 4G/LTE device from OPPO that also supports Quad HD resolution. The phone made its global entry to the market back in March in Beijing. 

The OPPO Find 7

     Succeeding the award-winning Find 5, the Find 7 was intently crafted with the user in mind whilst raising the bar on innovation in mobile technology. The OPPO Find 7 opens up a new world of resolution with its introduction of a 5.5-inch Quad HD display featuring Touch-on-Lens technology. The Touch-on-Lens technology paired with Gorilla Glass 3 makes the Find 7 screen not only tough, but sees a 40% improvement in strength.

A sample image from the UHD camera mode


     The phone also comes equipped with the Pure Image 2.0, a hardware and software photography solution that enhances images taken by the 13-megapixel camera to 50-megapixel images. This “Ultra-HD” mode accomplishes this by taking ten photos at the back end with just one press of a button, and then combines the photos to create images perfect for high quality prints. Pure Image on the OPPO Find 7 includes six physical lenses, the latest Sony Stacked CMOS IMX214 sensor and f/2.0 wide aperture, ensuring crisp images every time. 

     Built around a solid titanium-aluminium alloy frame, the Find 7 houses some of the most modern technologies. One such innovation is the newly developed VOOC fast charging technology that easily shortens charging time, boosting the phone’s battery life to 75% within 30 minutes. This rapid charging technology also has a safety feature made up of five layers of thermal protective coating that prevents overheating while charging.

     Adding to the entire experience is the Technical GRAMMY Award winning MaxxAudio’s enhancement suite that greatly increases the dynamic range and frequency of the Find 7, providing crisp, high-quality sound for your listening pleasure.

     “Having just launched the brand in Malaysia back in February, we are very excited to introduce one of the most technologically-advanced phones in our range, the Find 7. Continuing the tradition of quality design and craftsmanship in the Find series, the Find 7 utilizes top of the line technologies that aims to enhance the smartphone experience for all our customers,” commented William Fang, OPPO Electronics Chief Executive Officer.

     The Find 7a is officially available at all outlets at price of RM 1,598 while Find 7 will be selling at price of RM 1,998 and will be available in Malaysia nationwide end of June.