Showing posts with label guide. Show all posts

Measuring Your PCs Performance (Guide & Thought Process)


     It's been about a month since I built the Puffer, As soon as I got it, I went along my merry way and just gamed through the weeks. Since my hype about my new rig is a tad more worn down now, I decided to stress test my PC to see how it's doing. If you want to read up on the rationale behind this build, read my build log over here.

     Before we get started, we have to get our tools ready. Below is the list of tools I have used thus far.


1. AI Suite 3. Adjust voltages and clock speeds without having to go through the hassle of booting into the BIOS. There's also a bunch of other goodies packed into the software. Awesome tool to utilize if you have an ASUS motherboard.

2. Realtemp. Just a simple and reliable temperature monitor.

3. AIDA64. I chose this over Prime95 due to... due to... actually I have no idea why but I went with AIDA64 anyway. Either one of these will work fine.

4. ASUS GPUTweak. One of the many GPU overclocking tools to choose from. I have an ASUS card so I figured I would use this instead of MSI Afterburner.

5. 3DMark. Bought this on the last steam sale. Of course synthetic benchmarks are not an accurate representation of how a rig will perform during real games. However, in this age of "screenshots or it didn't happen", 3DMark standardized benchmarks works better numbers wise.

6. Unigine Heaven Benchmark. I see a lot of reviewers use this to demonstrate their point so I guessed I would try it as well.

     Before I went around tweaking stuff, I did a dry run of AIDA64's stress test and to my surprise, my 4790K was throttling due to constantly hitting almost the 100C mark. After some intense Google searches, I figured that I didn't tighten my CPU block enough. After tightening the CPU block, I did another run, the throttling stopped, but the temps were still around 80C give or take 5C.

     After some further reading on the interwebs, I learned that my CPU voltage might be the culprit. Opening up AI Suite 3, my motherboard has default to using adaptive voltage which resulted in the CPU using about 0.2v more than the recommended voltage. After dialing down the CPU voltage to 1.130v, I also "underclocked" it to match the stock Intel settings of 3-cores 4.3GHz and 4-cores 4.2GHz instead of ASUS's default all cores 4.4GHz.


     With everything ready to rumble, I ran another AIDA64 run for about 30 mins to test for stability and the results has shown to be consistent with other users on the interwebs. At 100% loads, I averaged around 73C which I was pretty satisfied about. I could probably turn down the voltage a few more notches to optimize the heat output but for now I guess it's fine. Oh, and my idle temps are around 34-36C if you were wondering.


     Since I have pretty much fixed my initial problem, now it's time to tend to my graphics card. I checked the "overclocking range enhancement" so that I can increase the max GPU voltage and push the core clock even further.


     Below are the important numbers, before and after overclocking. You can use the numbers to overclock your Strix 970 but sometimes it just won't work. Something to keep an eye on would be the memory clock as I have seen other people get much better memory clocks than mine so don't worry about it too much. Oh and to determine whether a overclock is stable or not, just run a demanding game and see if any artifacts appear, if no, you are good to go.


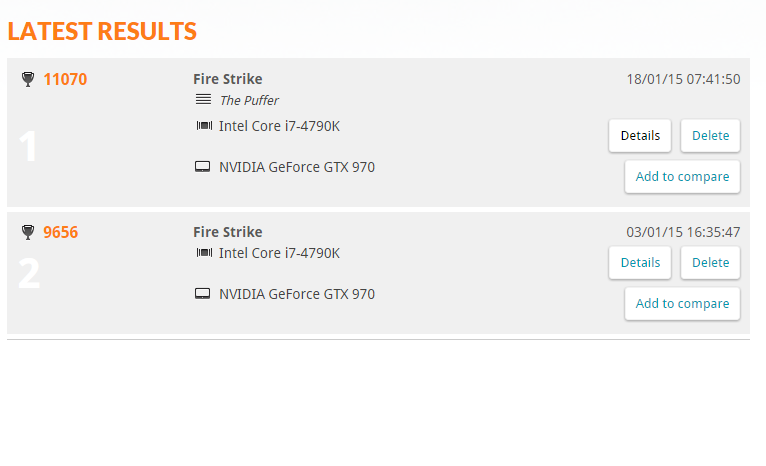
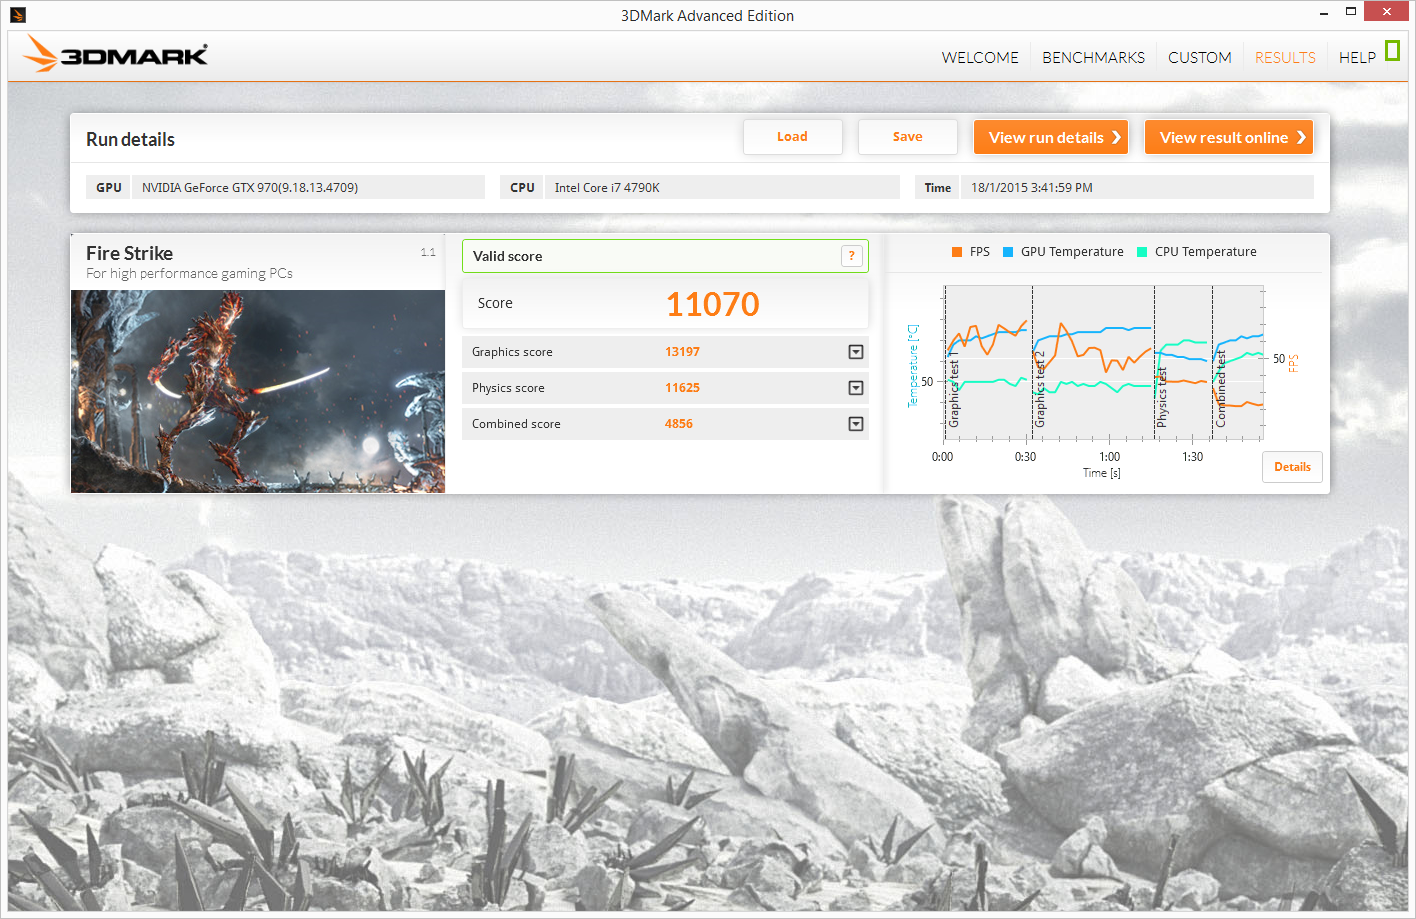
     I ran a 3DMark Fire Strike test at the beginning of the month to see how well my card performed and my rig scored 9656. After overclocking, my rig scores 11070 which is a lot of improvement per say; just goes to show that NVIDIA's Maxwell architecture is a great overclocker. I have some screenshots below and here's the link to the results of pre and post overclocking.


     Last but not least, I ran Unigine Heaven to measure "more realistic" performance (according to reviewers at least). I scored 1538 at 1080P Ultra with extreme tessellation and 8x AA. Remember when you compare scores with others, make sure you are using the same settings as them to avoid unnecessary confusion.


     That about sums up everything I did for performance tuning and benchmarking. I'm still looking for other tweaks that may improve the performance, so if you have any other pointers I should follow, do leave a comment down below and let me know.

Build Log - The Puffer


     Hi guys! This is my first PC build log. I have been wanting to build a rig for quite some time now but never got around to doing it. This time though, the stars aligned and I decided to take the bait. This post will mostly be about my building experience, part selection rationale and other things that are relevant provided I don't go on a tangent.


     First of all, the rationale behind the specifications. I have listed my general specifications on the image above. I went with the Intel I7-4790K for future-proofing as well as to accelerate my occasional video rendering (and for dem overclocking). Multi-core seems to also be a focal point for the next iteration of DirectX 12 so there's that too. To cool a top-of-the-line processor, I have gone with the close-loop AIO cooler, Corsair's H100i instead of a more conventional air cooler to make things more manageable as air coolers tend to get in the way in the build process. For the motherboard, I went with the ASUS Maximus VII Ranger. Reason being that it seems to be pretty user-friendly and the understated red/black colour scheme looks pretty sweet. In the graphics card department I went with the ASUS GTX 970 Strix. Again, the colour scheme is another factor in this choice as well as the included backplate for a more rigid construction. I only got 8GB of RAM due to budget restrictions. For storage, I have a SSD for the lightning fast boot speed and a 7200RPM HDD for general storage. Powering the rig is the Seasonic M12II Evo 750W. I chose the 750W PSU so I can perhaps add another graphics card in the future and the flat black cables goes pretty well with the colour scheme. Enclosing all this is the Corsair Carbide Air 540. I chose the Air 540 for the two-chamber design (hide dem cable clutter) and its focus on air flow to provide breathing room for the graphics card.

before routing cables
     I used guides from LinusTechTips and ASUS PCDIY which can all be found on YouTube. Overall speaking, the building process was much harder than I anticipated. Almost nothing got plugged in correct the first time through, be it the IO shield or RAM DIMMs. I spent about 3 hours trying to get everything in place and another 1 and a half trying to plug in all the cables. I think the reason why the process took so long is because I was unsure how much force should be applied on the different parts. Also, don't get me started on cable management; if I had a smaller case I think it would have went terribly, I feel that the Air 540 is certainly well built for beginners like me.


     The motherboard was also a lifesaver with ASUS's Q-code LED display. It helped me diagnosed a lot of the initial problems like with the "RAM not pushed hard enough" issue. Speaking of not pushing hard enough, my 1TB storage drive was also not pushed deep enough (that's what she said); apparently, there are two clicks when plugging the drive into the Air 540's hot-swap bay which is kind of weird.


     Oh and if you haven't notice already, I named the rig Puffer because the Air 540's cube design reminds me of a blowfish, so I figured it was only appropriate to name it as such. No omega, trinity, poseidon names for me this time round.

FINAL RESULT


     The front cable management is not that great, I know. I will redo it when I feel the need for that, for now, I rather go through my Steam library again. I forgot to take a picture of the cable management at the back but I think you guys will be fine without seeing the mess there.

Map to the Custom ROMs: OPPO Find 7a


     This post will basically be an overview of a few of the custom ROMs that are available for the OPPO Find 7a: Paranoid Android 4.6 Beta 1, CyanogenMod 11, Omni ROM and Dirty Unicorn v7.9; and a micro how-to guide.

    Before you are ready to proceed, you need to get your device rooted and equipped with a custom recovery. If you have no idea how to do that, you can head over to my other guide over here: How to root your OPPO Find 7 & Find 7a. If you have everything sorted, time to bust out your command line for some fastboot action.

     After making up your mind on what ROM you are going to flash, download the main package, open it up and you will find something called "boot.img" inside the zip file. Put it into your fastboot folder established in my previous guide so you would have something like the folder below. You should also get a Google apps package from wherever your ROM dev recommends. For the Find 7a, it is recommended that you download the micro-modular package from Paranoid Android found here: Micro-GApps on Devhost


     Transfer the ROM's zip file and the Google apps zip file onto the your phone and put your phone into fastboot mode (Power off > hold power + volume up until vibration is felt.). Connect your phone to your PC over USB then fire up a command prompt and type the command below:

fastboot flash boot boot.img
     This will replace your device's kernel with something appropriate for the ROM you are about to flash. After that, unplug and boot into recovery (Power down > hold power + volume down until vibration is felt.). In the recovery menu, do a wipe user data and factory reset then select "Install from zip on sdcard" for CWM or "Install" in TWRP, then browse to the directory of the ROM's zip file, select and then install. After installation is complete, from the same menu, install the Google apps zip file as well. After that, you are basically set and have a new ROM installed on your device! With that clarified, below will be my opinion about some of the more popular ROMs out there.
NOTE: never ever ever use "fastboot erase cache" on this device, it will send your device into a bootloop and the only remedy would be a full wipe.


     Paranoid Android is currently my "flavour of the year" for most of my devices, reason being it simply has been one of the more innovative ROMs that introduces new ways to interact with a device. However, those glory days are over; so what is keeping me from switching to another ROM? Notice how PA has a "4.6" in their current release name? What makes this ROM two increments ahead of the current Android 4.4 KitKat. Apparently PA has implemented several Android L features like expandable heads-up notification, dynamic status bar and the new recent menu. If you are like the ever so impatient person I am, you will be thrilled to experience a piece of Android L before its time of release (which is pretty soon now). However, PA's implementation of a dynamic nav bar still has some polishing to do, while scrolling down, the nav bar will somehow change it's colour to an app's secondary colour, which makes it very uncomfortable to the eyes, you will understand from the screenshots below. To add on, PA also offers support for legacy functions on the Find 7a like the O-click, screen-off gestures and many more; so if you are a fan of OPPO's implementations on its ColorOS ROM, you are still able to utilize those.


     CyanogenMod... basically the staple name in the custom ROM scene. With so many years of experience developing ROMs, one can say that CM is the go-to ROM when stability is a main concern. However, stability is no longer a focus for the CM team as they are releasing nightly builds instead of stable builds on an interval. It also has been too long since anything has happened of note to CM. After incorporating into its own company, CM has been branded as a traitor to the Android spirit and I will be honest that it is also one of the reasons why I don't use CM on any of my devices any more. With all that aside though, CM11 is still a solid ROM for like PA, it also has support for legacy functions.


     This is actually the first time I have used an Omni release on any device. First impressions are that this flavour of ROM is actually pretty bare bones compared to CM11 which I already consider too basic already. What makes this ROM special is the implementation of something called OmniSwitch, think of it as Android's version of the assistive touch found on iOS. You can add your favourite apps onto it as well as access recent apps and also access hardware buttons on-screen. Legacy function support wise, Omni has much work to do as some of my favourite screen-off gestures like the arrow to skip track is not working as of now.


     What is Dirty Unicorn? If that's the question atop of your head, I will answer it for you; imagine a snowball rolling down the hill, picking up every inch of snow on its way down. That is what Dirty Unicorn is, it's a snowball of almost all ROMs known to man. Remember OmniSwitch? DU has it. Adblock? DU has it pre-installed. Anything you can imagine, already compiled into this neat package. However, nothing is perfect. The drawback of taking things from different ROMs and putting it together makes things seem unnecessarily cluttered, not to mention a few hiccups while playing around with what DU dubs as "Dirty Tweaks". If you want a taste of everything Android has to offer, this is the ROM for you. 

     Before I end this post, I would like to say that all these custom ROMs have some bugs in common, after all they are still forked from the same sources so it's no wonder they have similar bugs.
  • Mic not functioning on speaker phone
  • Photosphere and panorama not working
  • SuperHD(50mp) mode not working
  • Screen lighting up randomly when charging on VOOC
     To summarize:

     What's my pick though? If you didn't already know, I have already make it inherently clear that my favourite is Paranoid Android. How about you? What flavour of ROM do you prefer? There is so many different ROMs to experiment with so do head down to XDADevelopers and have a go on your Find 7a!

How to root your OPPO Find 7 (X9076) & Find 7a (X9006) Stock/Custom Recovery [Updated for ColorOS 2.0]


     Let me preface this guide with a little heads up that there is actually a lot of different threads showing different ways of rooting, a lot of which did not specify which method is meant for what specification of the phone. This post will clear up a lot of things in one page so you won't have to snoop around thread pages on XDA.
Note: If you are new to this whole thing, two rules to follow at all times: Have a charged phone if you're going to do anything; Stay calm no matter what message shows up.

tl;dr: Method 1 for pre-updated Find 7a/ Find 7, Method 2 for All Versions of Find 7a, Method 3 for All Versions of Find 7a and Find 7.

Method for ColorOS 2.0 Users 10/11/2014 (Working for X900x & X907x)
As of now, the only method to root will wipe your storage, PLEASE BACKUP BEFORE PROCEEDING. If anything is unclear, refer to Method 2


Files Needed: 
platform-tools: AndroidSDK.zip
Root: JaCh0o_KG3.4.0.zip (courtesy of Oppo forum user: JaCho0)
Recovery Flasher: Find7_Recovery_Flasher_v8.zip

1.     Extract AndroidSDK.zip on your PC, you will have a platform-tools folder.
2.     Move openrecovery-twrp-2.8.0.1-find7.img into the folder.
3.     Plug in your phone to your PC and move JaCh0o_KG3.4.0.zip and Find7_Recovery_Flasher_v8.zip into your phone.
4.     Turn off your phone. Now, hold the power button + volume up button until vibration is felt. Your screen should have the words 'fastboot' written on it.
5.     Fire up a command prompt by holding shift then right click and select "Open command window here" (NOTE: In some instances this command prompt window will not have administrator privileges so I recommend going into your System32 folder, most likely located at C:\Windows\System32 and copy cmd.exe into the SDK folder instead and run the cmd as administrator.)
6.     In the command prompt type: fastboot devices
7.     If everything goes smoothly, your device should show up in a alphanumeric string.
8.     Next, in the command line, type: fastboot oem unlock
9.     Your bootloader is now unlocked!
10.    Reboot into bootloader by typing: fastboot reboot-bootloader
11.    Next, type: fastboot flash recovery openrecovery-twrp-2.8.0.1-find7.img
12.    If no error messages, unplug phone and boot into recovery by holding the power button + volume down.
13.    You should be inside TWRP interface, select Install and browse for Find7_Recovery_Flasher_v8.zip and install. This is to make the recovery changes permanent.

14.    Inside the installer, select TWRP recovery> TWRP 2.8.0.1> Whatever theme and proceed. After installation complete, select reboot into new recovery.
15.    You will return to TWRP interface. Select Install and browse for JaCh0o_KG3.4.0.zip and confirm installation. After installation is done, reboot normally.
16.    Once phone is boot up, check if  'Kinguser' app is on phone. Open root explorer and see if you have root permission. If all is well, congratulations, your device is now rooted.

Method 1: The Easy but Outdated Method

     This method is pretty easy because it utilizes the existing recovery on the Find 7a but the shortcomings are obvious. It ONLY works with ColorOS version 1.2.2i and from what I've observed, most people are having difficulties flashing custom ROMs onto the phone using OPPO's recovery so I suggest that you follow method 2.
1.     Download this file: Find7_ROOT4.3_bbs.oppo.cn.zip onto your Find 7a or Find 7 (yes it works for both phones).
2.     Turn off your phone.
3.     Boot your phone into recovery mode by holding down the Volume Down button and the Power button, once it vibrates, you can let go.
4.     Select the Install from SD option and browse for the zip file you just downloaded. Follow the prompts and if everything goes as intended, you now have a rooted phone!

Method 2: The Veteran's Method
NOTE: This method is strictly for Find 7a (X9006/7)
     This method, while being slightly harder, is the most common method for rooting any other phone, so you might as well practice if you are planning to do this for any period of time. It works for any version of ColorOS and the custom recovery we are about to flash will be much more full featured compared to the stock recovery. We will be utilizing fastboot commands to flash a custom recovery so we will be needing the basic fastboot files found in Android's SDK. If you did not understand a single word in the last sentence, do not fright, download the files below and you will be fine.

  1. Transfer the Update-SuperSU-v1.94.zip onto your phone first for convenience purposes.
  2. On your PC, extract AndroidSDK.zip to anywhere, preferably on your desktop. Then browse into the folders until you come upon something that looks like what I'm showing below.
  3. Move the recovery image file of your choice (CWM or TWRP) into the folder. So you will see something similar to the screenshot below (I chose to go with CWM).
  4. Fire up a command prompt by holding shift then right click and select "Open command window here" (NOTE: In some instances this command prompt window will not have administrator privileges so I recommend going into your System32 folder, most likely located at C:\Windows\System32 and copy cmd.exe into the SDK folder instead and run the cmd as administrator.)
  5. Turn off your phone. Then hold the Volume Up button and Power button until you feel a vibration. The phone will boot up and show the word "fastboot" on screen. 
  6. Connect your phone to your PC via USB cable.
  7. Wait for a moment then in the command prompt type:
  8. fastboot devices
  9. If everything goes smoothly, your device should show up in the list as a random string of numbers
  10. Rename the X9007_CWM_Recovery or X9007_TWRP_Recovery to something simple like recovery for ease of work later.
  11. In the command prompt, type:
  12. fastboot flash recovery [imagename].img
    Replace [imagename] with actual name of image

  13. Something like this will show up if recovery is flashed successfully.
  14. Unplug your phone from your PC and hold Volume Down button and Power button to boot into recovery.
  15. Select Install zip from SD card
  16. Browse for Update-SuperSU-v1.94.zip and install it.
  17. Reboot and your phone is now rooted!
Method 3: The Simplest Method

     This method requires you to download something O-team developed so if you're not comfortable with that, use Method 2 instead. This method will work for all versions/variants of Find 7a & Find 7 and it's pretty straight forward.


  1. Transfer Update-SuperSU-v1.94.zip onto your phone.
  2. Boot phone into fastboot mode by pressing Volume Up button and Power button together until vibration is felt.
  3. Connect your phone to your PC via USB
  4. Run Recovery_Installer.exe and install the program.
  5. After installation successful, this window should pop up.
  6. Enter option number to install recovery of choice. (Find 7a users options 3 or 4; Find 7 users strictly option 5)
  7. Wait for process to complete.
  8. Boot into recovery via the program or Volume Down + Power button
  9. Select install zip from SD card then browse for Update-SuperSU-v1.94.zip and install it.
  10. Reboot and you're rooted!
I used Method 2 if you're wondering, because I am familiar with fastboot anyway. Do recommend you using Method 2 if you are looking into rooting/flashing more phones in the future as it's a common tool when it comes to rooting Android phones.

[Updated 14/2/2015]How to root your LG G Pro2 (D838) 16/32GB

Rooting your LG G Pro2

UPDATE: GeoHot has released an APK that enables root for most devices, and fortunately enough, the APK works for the G Pro2 as well. I would recommend using that APK to root your phone instead due to the inherently complex nature to root this particular device. This method is still working as of January 2015 so yeah, pick your poison.: LINK

LOLLIPOP (5.0.1) USERS READ UPDATE 2

UPDATE2: Can't seem to root the G Pro 2 since updating to Lollipop, if you guys have any tips, drop me an e-mail or leave a comment down below. There's a stupidly complicated way of rooting Lollipop 5.0.1 G Pro 2 apparently, you need to revert to KitKat and install recovery from this XDA thread. As to where to get the Kitkat KDZ file, this website will help you. Next, you need to flash to Lollipop using the recovery you just installed, this thread on LGViet will give you everything you need to do so. To boot into recovery, you will need to install Quick Boot from the Play Store. Flash the ROM from the previously mentioned LGViet thread, then flash the latest SuperSU from chainfire's site. This should gain you root access to your G Pro 2. Credits to mobile01 poster 喵喵麥斯 for compiling all these info in Chinese. If you can read Chinese, I suggest that you refer to his post for better clarity. As of 14/2/2015, there are no easy one-click rooting methods. I will update you guys if I hear anything new.

     If you didn't already know, I recently acquired a LG G Pro2. The first thing I often do with new devices is to root said devices. So, I did the usual browse to xda-developers but there were no easy guide in sight. While there is a guide to root the G Pro2, but one has to dig pretty deep through a bunch of different threads to find a comprehensive procedure list. Today, I decided to compile everything that you need in order to root your G Pro2 here in this convenient post!

     Before I start, you are bearing all risks and I will not be responsible for you bricking your new phone. With that said, here are some things that you will need.

F350 stock firmware
D838 stock firmware
LG Flash Tool with Megalock applied
LG Mobile Drivers
iorootv24 (v25 also works)

     I have compiled everything you need and uploaded it to dropbox for your convenience: LINK HERE (NOTE: I have included the 16GB D838 SG firmware as well since maybe some of you need it, if you have the 32GB version, use the files in the 32GB folder; if you have the 16GB version, check the phone for system updates, after updating, download the stuff in the 16GB folder and use that instead.)

DISCLAIMER: This guide was written from my experience of  rooting a 32GB D838 SG variant, some file names may differ from the screenshot if you are using the 16GB version files instead.

ORIGINAL VERSION OF GUIDE (in Chinese): G Pro2 台版Root刷机步骤教学 by z30152
PROCEDURE
  1. Download everything from my dropbox.
  2. Install the LG Mobile Drivers (LGUnitedMobile...Ver_3.8.1.zip)
  3. Install the LG Flash Tool (Setup_LGFlashTool.zip) and then copy the MegaLock.dll from MegaLock.rar to C:\LG\LGFlashTool (default install directory)
  4. Put your phone into Download Mode (turn off your phone, then while holding the volume up button, plug in your phone to your PC.
  5. On your PC, open up device manager, scroll down to "Ports (COM & LPT)", right click on "LGE AndroidNet USB Serial Port (COMXX)" and go to properties.

  6. Rooting your LG G Pro2

  7. Then go to the Port Settings Tab and click on Advanced. Set the COM Port Number to COM41.
    Rooting your LG G Pro2

  8. Now, open up the LG Flash Tool, click on the last option and you should be greeted with the screen below. Check "Select Manual Mode" and in the select the respective files as shown in the screenshot below. Remember, its the F350.tot, NOT the D838.
    Rooting your LG G Pro2

  9. Click on the yellow arrow on the top left, the first box should show "READY". Now, unplug your phone for 5 seconds, then plug it in again, the procedure should begin.
    Rooting your LG G Pro2

  10. After the procedure is complete, your phone should reboot. Now extract everything from the ioroot24.zip and run the root.bat. For more information, you can refer to this thread on XDA (NOTE: If you are facing problems rooting using the root.bat, use the manual method I've written down below)
  11. After successfully rooting (check with root checker from the Play Store), put your phone back into download mode, and repeat steps 7 & 8, but this time with the D838.tot
    Rooting your LG G Pro2
  12. After successful reflash, TADA! Your D838 is now rooted!
IOROOT Manual Method (NOTE: Remember to turn on USB debugging)
***********************************
Set USB mode to Charging only(this may vary based on model). 
Confirm device is detected in ADB using "adb devices" command. 
Be sure to accept the RSA prompt on your phone.. and check the "always" box as well. 
Run script and follow the onscreen instructions. 
If the script is stick at "waiting for device"..  turn your phone screen on and unlock it.. make sure ADB has the proper permission and that the ADB RSA prompt isn't sitting on the YES/NO screen. Check the "always remember" box when you accept it!!!
Make sure the phone is unlocked with the screen on whenever possible as well, i.e. turn off the lock screen and screen timeout set to “never”
*********************************************

1: adb devices
(make sure it sees your device; if "offline" turn on phone/unlock and accept RSA key prompt)
2: Choose next line based on model and firmware version:
F350K/L/S (4.4.2): adb push ytiruces_1a_kk /sdcard/ytiruces_1a

********************************************************
This next depends on your computer/phone model...
USB Connection Mode needs to be toggled.
Ways to do this are listed below...
a. Unplug usb cable from phone then re-plug.
b. Toggle USB mode from Charge to MTP back to Charge
c. Toggle USB mode from Ethernet to MTP back to Ethernet (VZW users)
********************************************************

3: adb shell
(you should now see a # instead of a $. # = root)
4: exit
5: adb shell "mount -o remount,rw /system"
6: adb push su /system/xbin/su
7: adb push su /system/xbin/daemonsu
8: adb push install-recovery.sh /system/etc/install-recovery.sh
9: adb shell "chown 0.0 /system/xbin/su;chmod 06755 /system/xbin/su"
10: adb shell "chown 0.0 /system/xbin/daemonsu;chmod 06755 /system/xbin/daemonsu"
11: adb shell "chown 0.2000 /system/etc/install-recovery.sh;chmod 755 /system/etc/install-recovery.sh"
12: adb shell "sync;mount -o remount,ro /system"
13: adb install Superuser.apk