.png)

[Updated 14/2/2015]How to root your LG G Pro2 (D838) 16/32GB

UPDATE: GeoHot has released an APK that enables root for most devices, and fortunately enough, the APK works for the G Pro2 as well. I would recommend using that APK to root your phone instead due to the inherently complex nature to root this particular device. This method is still working as of January 2015 so yeah, pick your poison.: LINK
LOLLIPOP (5.0.1) USERS READ UPDATE 2
UPDATE2:
If you didn't already know, I recently acquired a LG G Pro2. The first thing I often do with new devices is to root said devices. So, I did the usual browse to xda-developers but there were no easy guide in sight. While there is a guide to root the G Pro2, but one has to dig pretty deep through a bunch of different threads to find a comprehensive procedure list. Today, I decided to compile everything that you need in order to root your G Pro2 here in this convenient post!
Before I start, you are bearing all risks and I will not be responsible for you bricking your new phone. With that said, here are some things that you will need.
F350 stock firmware
D838 stock firmware
LG Flash Tool with Megalock applied
LG Mobile Drivers
iorootv24 (v25 also works)
D838 stock firmware
LG Flash Tool with Megalock applied
LG Mobile Drivers
iorootv24 (v25 also works)
I have compiled everything you need and uploaded it to dropbox for your convenience: LINK HERE (NOTE: I have included the 16GB D838 SG firmware as well since maybe some of you need it, if you have the 32GB version, use the files in the 32GB folder; if you have the 16GB version, check the phone for system updates, after updating, download the stuff in the 16GB folder and use that instead.)
DISCLAIMER: This guide was written from my experience of rooting a 32GB D838 SG variant, some file names may differ from the screenshot if you are using the 16GB version files instead.
DISCLAIMER: This guide was written from my experience of rooting a 32GB D838 SG variant, some file names may differ from the screenshot if you are using the 16GB version files instead.
ORIGINAL VERSION OF GUIDE (in Chinese): G Pro2 台版Root刷机步骤教学 by z30152
PROCEDURE
- Download everything from my dropbox.
- Install the LG Mobile Drivers (LGUnitedMobile...Ver_3.8.1.zip)
- Install the LG Flash Tool (Setup_LGFlashTool.zip) and then copy the MegaLock.dll from MegaLock.rar to C:\LG\LGFlashTool (default install directory)
- Put your phone into Download Mode (turn off your phone, then while holding the volume up button, plug in your phone to your PC.
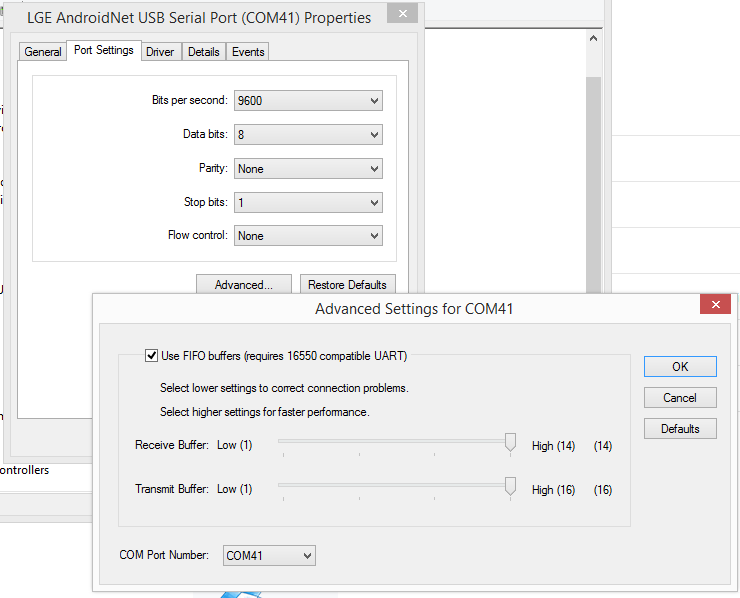
- On your PC, open up device manager, scroll down to "Ports (COM & LPT)", right click on "LGE AndroidNet USB Serial Port (COMXX)" and go to properties.

- Then go to the Port Settings Tab and click on Advanced. Set the COM Port Number to COM41.
- Now, open up the LG Flash Tool, click on the last option and you should be greeted with the screen below. Check "Select Manual Mode" and in the select the respective files as shown in the screenshot below. Remember, its the F350.tot, NOT the D838.

- Click on the yellow arrow on the top left, the first box should show "READY". Now, unplug your phone for 5 seconds, then plug it in again, the procedure should begin.

- After the procedure is complete, your phone should reboot. Now extract everything from the ioroot24.zip and run the root.bat. For more information, you can refer to this thread on XDA (NOTE: If you are facing problems rooting using the root.bat, use the manual method I've written down below)
- After successfully rooting (check with root checker from the Play Store), put your phone back into download mode, and repeat steps 7 & 8, but this time with the D838.tot

- After successful reflash, TADA! Your D838 is now rooted!
IOROOT Manual Method (NOTE: Remember to turn on USB debugging)
***********************************
Set USB mode to Charging only(this may vary based on model).
Confirm device is detected in ADB using "adb devices" command.
Be sure to accept the RSA prompt on your phone.. and check the "always" box as well.
Run script and follow the onscreen instructions.
If the script is stick at "waiting for device"..  turn your phone screen on and unlock it.. make sure ADB has the proper permission and that the ADB RSA prompt isn't sitting on the YES/NO screen. Check the "always remember" box when you accept it!!!
Make sure the phone is unlocked with the screen on whenever possible as well, i.e. turn off the lock screen and screen timeout set to “never”
*********************************************

1: adb devices
(make sure it sees your device; if "offline" turn on phone/unlock and accept RSA key prompt)
2: Choose next line based on model and firmware version:
F350K/L/S (4.4.2): adb push ytiruces_1a_kk /sdcard/ytiruces_1a

********************************************************
This next depends on your computer/phone model...
USB Connection Mode needs to be toggled.
Ways to do this are listed below...
a. Unplug usb cable from phone then re-plug.
b. Toggle USB mode from Charge to MTP back to Charge
c. Toggle USB mode from Ethernet to MTP back to Ethernet (VZW users)
********************************************************

3: adb shell
(you should now see a # instead of a $. # = root)
4: exit
5: adb shell "mount -o remount,rw /system"
6: adb push su /system/xbin/su
7: adb push su /system/xbin/daemonsu
8: adb push install-recovery.sh /system/etc/install-recovery.sh
9: adb shell "chown 0.0 /system/xbin/su;chmod 06755 /system/xbin/su"
10: adb shell "chown 0.0 /system/xbin/daemonsu;chmod 06755 /system/xbin/daemonsu"
11: adb shell "chown 0.2000 /system/etc/install-recovery.sh;chmod 755 /system/etc/install-recovery.sh"
12: adb shell "sync;mount -o remount,ro /system"
13: adb install Superuser.apk
![[Updated 14/2/2015]How to root your LG G Pro2 (D838) 16/32GB](https://blogger.googleusercontent.com/img/b/R29vZ2xl/AVvXsEjkY8Y7i9l2uFPJopjlnr2KMnfJi0aklEC2b-GYGiPfLMxMbfNZ5YUj2keosvTlxF12NMOuNarLVif_wAUnfbwpPGRyFNU2eo8b6tsEz2u3DDLd5G4wvxD318gViu78Uxk6y0a6M6t9FRcc/s72-c/root+guide.jpg)
![How to root your OPPO Find 7 (X9076) & Find 7a (X9006) Stock/Custom Recovery [Updated for ColorOS 2.0]](https://blogger.googleusercontent.com/img/b/R29vZ2xl/AVvXsEgCiB_-MGvCpPXX28qC4nLbxmdHrFKSqgCPOhx8I8eEC180X3VC_o9YMaLzb80SNqq1aKDarK6y1daaLF6140d60XjT9ZcOd1_PsgQJvRYxXknJW-KNhnfJq27gUvYWa7M2PhUJy-pLPU_g/s72-c/root+guide.jpg)


