Let me preface this guide with a little heads up that there is actually a lot of different threads showing different ways of rooting, a lot of which did not specify which method is meant for what specification of the phone. This post will clear up a lot of things in one page so you won't have to snoop around thread pages on XDA.
Note: If you are new to this whole thing, two rules to follow at all times: Have a charged phone if you're going to do anything; Stay calm no matter what message shows up.
tl;dr: Method 1 for pre-updated Find 7a/ Find 7, Method 2 for All Versions of Find 7a, Method 3 for All Versions of Find 7a and Find 7.
Method for ColorOS 2.0 Users 10/11/2014 (Working for X900x & X907x)
As of now, the only method to root will wipe your storage, PLEASE BACKUP BEFORE PROCEEDING. If anything is unclear, refer to Method 2
Files Needed:
1. Extract AndroidSDK.zip on your PC, you will have a platform-tools folder.
2. Move openrecovery-twrp-2.8.0.1-find7.img into the folder.
3. Plug in your phone to your PC and move JaCh0o_KG3.4.0.zip and Find7_Recovery_Flasher_v8.zip into your phone.
4. Turn off your phone. Now, hold the power button + volume up button until vibration is felt. Your screen should have the words 'fastboot' written on it.
5. Fire up a command prompt by holding shift then right click and select "Open command window here" (NOTE: In some instances this command prompt window will not have administrator privileges so I recommend going into your System32 folder, most likely located at C:\Windows\System32 and copy cmd.exe into the SDK folder instead and run the cmd as administrator.)
6. In the command prompt type: fastboot devices
7. If everything goes smoothly, your device should show up in a alphanumeric string.
8. Next, in the command line, type: fastboot oem unlock
9. Your bootloader is now unlocked!
10. Reboot into bootloader by typing: fastboot reboot-bootloader
11. Next, type: fastboot flash recovery openrecovery-twrp-2.8.0.1-find7.img
12. If no error messages, unplug phone and boot into recovery by holding the power button + volume down.
13. You should be inside TWRP interface, select Install and browse for Find7_Recovery_Flasher_v8.zip and install. This is to make the recovery changes permanent.
14. Inside the installer, select TWRP recovery> TWRP 2.8.0.1> Whatever theme and proceed. After installation complete, select reboot into new recovery.
15. You will return to TWRP interface. Select Install and browse for JaCh0o_KG3.4.0.zip and confirm installation. After installation is done, reboot normally.
16. Once phone is boot up, check if 'Kinguser' app is on phone. Open root explorer and see if you have root permission. If all is well, congratulations, your device is now rooted.
Method 1: The Easy but Outdated Method
This method is pretty easy because it utilizes the existing recovery on the Find 7a but the shortcomings are obvious. It ONLY works with ColorOS version 1.2.2i and from what I've observed, most people are having difficulties flashing custom ROMs onto the phone using OPPO's recovery so I suggest that you follow method 2.
1. Download this file: Find7_ROOT4.3_bbs.oppo.cn.zip onto your Find 7a or Find 7 (yes it works for both phones).
2. Turn off your phone.
3. Boot your phone into recovery mode by holding down the Volume Down button and the Power button, once it vibrates, you can let go.
4. Select the Install from SD option and browse for the zip file you just downloaded. Follow the prompts and if everything goes as intended, you now have a rooted phone!
Method 2: The Veteran's Method
NOTE: This method is strictly for Find 7a (X9006/7)
This method, while being slightly harder, is the most common method for rooting any other phone, so you might as well practice if you are planning to do this for any period of time. It works for any version of ColorOS and the custom recovery we are about to flash will be much more full featured compared to the stock recovery. We will be utilizing fastboot commands to flash a custom recovery so we will be needing the basic fastboot files found in Android's SDK. If you did not understand a single word in the last sentence, do not fright, download the files below and you will be fine.
- Transfer the Update-SuperSU-v1.94.zip onto your phone first for convenience purposes.
- On your PC, extract AndroidSDK.zip to anywhere, preferably on your desktop. Then browse into the folders until you come upon something that looks like what I'm showing below.
- Move the recovery image file of your choice (CWM or TWRP) into the folder. So you will see something similar to the screenshot below (I chose to go with CWM).
- Fire up a command prompt by holding shift then right click and select "Open command window here" (NOTE: In some instances this command prompt window will not have administrator privileges so I recommend going into your System32 folder, most likely located at C:\Windows\System32 and copy cmd.exe into the SDK folder instead and run the cmd as administrator.)
- Turn off your phone. Then hold the Volume Up button and Power button until you feel a vibration. The phone will boot up and show the word "fastboot" on screen.
- Connect your phone to your PC via USB cable.
- Wait for a moment then in the command prompt type:
fastboot devices
- If everything goes smoothly, your device should show up in the list as a random string of numbers
- Rename the X9007_CWM_Recovery or X9007_TWRP_Recovery to something simple like recovery for ease of work later.
- In the command prompt, type:
fastboot flash recovery [imagename].img
Replace [imagename] with actual name of image
- Something like this will show up if recovery is flashed successfully.
- Unplug your phone from your PC and hold Volume Down button and Power button to boot into recovery.
- Select Install zip from SD card
- Browse for Update-SuperSU-v1.94.zip and install it.
- Reboot and your phone is now rooted!
Method 3: The Simplest Method
This method requires you to download something O-team developed so if you're not comfortable with that, use Method 2 instead. This method will work for all versions/variants of Find 7a & Find 7 and it's pretty straight forward.
- Transfer Update-SuperSU-v1.94.zip onto your phone.
- Boot phone into fastboot mode by pressing Volume Up button and Power button together until vibration is felt.
- Connect your phone to your PC via USB
- Run Recovery_Installer.exe and install the program.
- After installation successful, this window should pop up.
- Enter option number to install recovery of choice. (Find 7a users options 3 or 4; Find 7 users strictly option 5)
- Wait for process to complete.
- Boot into recovery via the program or Volume Down + Power button
- Select install zip from SD card then browse for Update-SuperSU-v1.94.zip and install it.
- Reboot and you're rooted!
I used Method 2 if you're wondering, because I am familiar with fastboot anyway. Do recommend you using Method 2 if you are looking into rooting/flashing more phones in the future as it's a common tool when it comes to rooting Android phones.
UPDATE: GeoHot has released an APK that enables root for most devices, and fortunately enough, the APK works for the G Pro2 as well. I would recommend using that APK to root your phone instead due to the inherently complex nature to root this particular device. This method is still working as of January 2015 so yeah, pick your poison.: LINK
LOLLIPOP (5.0.1) USERS READ UPDATE 2
UPDATE2: Can't seem to root the G Pro 2 since updating to Lollipop, if you guys have any tips, drop me an e-mail or leave a comment down below. There's a stupidly complicated way of rooting Lollipop 5.0.1 G Pro 2 apparently, you need to revert to KitKat and install recovery from this XDA thread. As to where to get the Kitkat KDZ file, this website will help you. Next, you need to flash to Lollipop using the recovery you just installed, this thread on LGViet will give you everything you need to do so. To boot into recovery, you will need to install Quick Boot from the Play Store. Flash the ROM from the previously mentioned LGViet thread, then flash the latest SuperSU from chainfire's site. This should gain you root access to your G Pro 2. Credits to mobile01 poster 喵喵麥斯 for compiling all these info in Chinese. If you can read Chinese, I suggest that you refer to his post for better clarity. As of 14/2/2015, there are no easy one-click rooting methods. I will update you guys if I hear anything new.
If you didn't already know, I recently acquired a LG G Pro2. The first thing I often do with new devices is to root said devices. So, I did the usual browse to xda-developers but there were no easy guide in sight. While there is a guide to root the G Pro2, but one has to dig pretty deep through a bunch of different threads to find a comprehensive procedure list. Today, I decided to compile everything that you need in order to root your G Pro2 here in this convenient post!
Before I start, you are bearing all risks and I will not be responsible for you bricking your new phone. With that said, here are some things that you will need.
F350 stock firmware
D838 stock firmware
LG Flash Tool with Megalock applied
LG Mobile Drivers
iorootv24 (v25 also works)
I have compiled everything you need and uploaded it to dropbox for your convenience:
LINK HERE (NOTE: I have included the 16GB D838 SG firmware as well since maybe some of you need it, if you have the 32GB version, use the files in the 32GB folder; if you have the 16GB version, check the phone for system updates, after updating, download the stuff in the 16GB folder and use that instead.)
DISCLAIMER: This guide was written from my experience of rooting a 32GB D838 SG variant, some file names may differ from the screenshot if you are using the 16GB version files instead.
PROCEDURE
- Download everything from my dropbox.
- Install the LG Mobile Drivers (LGUnitedMobile...Ver_3.8.1.zip)
- Install the LG Flash Tool (Setup_LGFlashTool.zip) and then copy the MegaLock.dll from MegaLock.rar to C:\LG\LGFlashTool (default install directory)
- Put your phone into Download Mode (turn off your phone, then while holding the volume up button, plug in your phone to your PC.
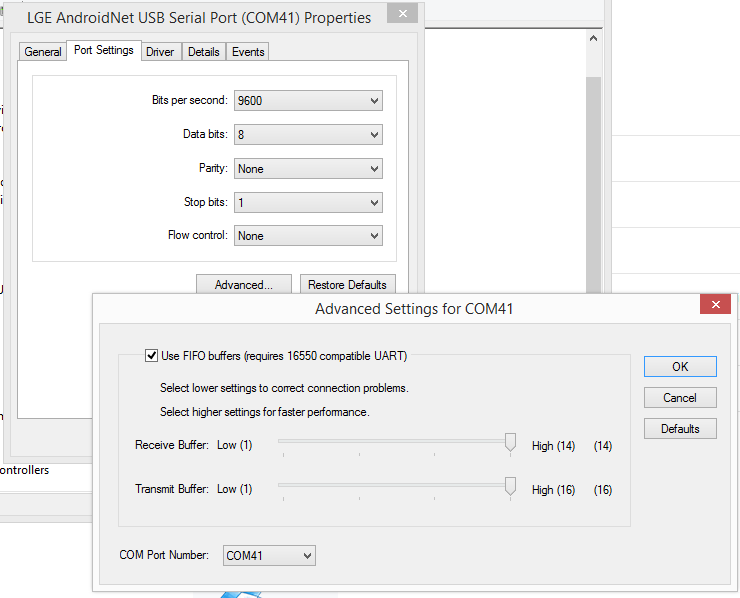
- On your PC, open up device manager, scroll down to "Ports (COM & LPT)", right click on "LGE AndroidNet USB Serial Port (COMXX)" and go to properties.
Then go to the Port Settings Tab and click on Advanced. Set the COM Port Number to COM41.
Now, open up the LG Flash Tool, click on the last option and you should be greeted with the screen below. Check "Select Manual Mode" and in the select the respective files as shown in the screenshot below. Remember, its the F350.tot, NOT the D838.
Click on the yellow arrow on the top left, the first box should show "READY". Now, unplug your phone for 5 seconds, then plug it in again, the procedure should begin.
After the procedure is complete, your phone should reboot. Now extract everything from the ioroot24.zip and run the root.bat. For more information, you can refer to this thread on
XDA (NOTE: If you are facing problems rooting using the root.bat, use the manual method I've written down below)
After successfully rooting (check with root checker from the Play Store), put your phone back into download mode, and repeat steps 7 & 8, but this time with the D838.tot
After successful reflash, TADA! Your D838 is now rooted!
IOROOT Manual Method (NOTE: Remember to turn on USB debugging)
***********************************
Set USB mode to Charging only(this may vary based on model).
Confirm device is detected in ADB using "adb devices" command.
Be sure to accept the RSA prompt on your phone.. and check the "always" box as well.
Run script and follow the onscreen instructions.
If the script is stick at "waiting for device"..  turn your phone screen on and unlock it.. make sure ADB has the proper permission and that the ADB RSA prompt isn't sitting on the YES/NO screen. Check the "always remember" box when you accept it!!!
Make sure the phone is unlocked with the screen on whenever possible as well, i.e. turn off the lock screen and screen timeout set to “never”
*********************************************

1: adb devices
(make sure it sees your device; if "offline" turn on phone/unlock and accept RSA key prompt)
2: Choose next line based on model and firmware version:
F350K/L/S (4.4.2): adb push ytiruces_1a_kk /sdcard/ytiruces_1a

********************************************************
This next depends on your computer/phone model...
USB Connection Mode needs to be toggled.
Ways to do this are listed below...
a. Unplug usb cable from phone then re-plug.
b. Toggle USB mode from Charge to MTP back to Charge
c. Toggle USB mode from Ethernet to MTP back to Ethernet (VZW users)
********************************************************

3: adb shell
(you should now see a # instead of a $. # = root)
4: exit
5: adb shell "mount -o remount,rw /system"
6: adb push su /system/xbin/su
7: adb push su /system/xbin/daemonsu
8: adb push install-recovery.sh /system/etc/install-recovery.sh
9: adb shell "chown 0.0 /system/xbin/su;chmod 06755 /system/xbin/su"
10: adb shell "chown 0.0 /system/xbin/daemonsu;chmod 06755 /system/xbin/daemonsu"
11: adb shell "chown 0.2000 /system/etc/install-recovery.sh;chmod 755 /system/etc/install-recovery.sh"
12: adb shell "sync;mount -o remount,ro /system"
13: adb install Superuser.apk
A few months back, I remember seeing weird pictures/tweets appearing on famous leak (more like psuedo marketing) account, @evleaks which were apparently sponsor messages. These messages made fun of campaigns created by other phone manufacturer. From 'Goodbye Moto' to 'Here's The Change', followed by the hashtag '#neversettle' and OnePlus branding. Since it was sponsored, I didn't pay much mind to it; that was the case, until specifications of a phone named OnePlus One was released. It swept all Android enthusiasts off their feet; the phone that was announced to be less than $400 (~MYR 1,300), had specifications of a flagship that would normally cost more than $600 (~MYR 2,000).
Of course, being the ever so sceptical me, I went "Cool, now what are you not telling me? ". Since it was not the full specifications nor had the design of the phone surfaced, I naturally made the assumption that there were gimmicks used in order to reach this price point. Fortunately, over the past month, I was proven wrong.
Yesterday, press renders came out and showed the world what the One allegedly looked like. If the leak is true, the One will easily be one of the first phones that comply to most of the wishes of the Android community, or well at least the Android community on Reddit. Beautifully designed phone (dat interchangeable back) , with specifications to walk the talk.
 |
| a photo taken by the phone |
So you might be saying, "Cool phone. So what?" Perhaps this will be a take-off point, for Android phones. Nevertheless, the OnePlus One will be officially released on April 23rd. In three more days, we will know if this is the One to rule them all.
.png)






![[Updated 14/2/2015]How to root your LG G Pro2 (D838) 16/32GB](https://blogger.googleusercontent.com/img/b/R29vZ2xl/AVvXsEjkY8Y7i9l2uFPJopjlnr2KMnfJi0aklEC2b-GYGiPfLMxMbfNZ5YUj2keosvTlxF12NMOuNarLVif_wAUnfbwpPGRyFNU2eo8b6tsEz2u3DDLd5G4wvxD318gViu78Uxk6y0a6M6t9FRcc/s72-c/root+guide.jpg)


![How to root your OPPO Find 7 (X9076) & Find 7a (X9006) Stock/Custom Recovery [Updated for ColorOS 2.0]](https://blogger.googleusercontent.com/img/b/R29vZ2xl/AVvXsEgCiB_-MGvCpPXX28qC4nLbxmdHrFKSqgCPOhx8I8eEC180X3VC_o9YMaLzb80SNqq1aKDarK6y1daaLF6140d60XjT9ZcOd1_PsgQJvRYxXknJW-KNhnfJq27gUvYWa7M2PhUJy-pLPU_g/s72-c/root+guide.jpg)